The Table of Contents
This topic covers the full Table of Contents. See Bits and Pieces for in-topic Mini TOCs.
 In Adobe RoboHelp the TOC controls to what goes into your build.
The key thing to understand is that with one exception anything that is to be included in the build must be in the TOC. That does not mean users have to see all topics in the TOC. That is explained in The TOC Controls Your Outputs below.
Adobe RoboHelp structures the TOC in different ways for Online and Book outputs.
- Online is for any output that will be viewed online, such as frameless, responsive and ePub.
- Book is for PDF and Word outputs.
There is some degree of using online TOCs for PDF and Word outputs and using a book TOC for an online output. That is described in this topic.
Online and Book TOCs - Why the Change?
Previously there was one TOC structure that could be used for all types of output. However, that created some issues with Word outputs.
- TOCs in the authoring world are made up of books that contain nested books that may also contain nested books.
- Books in the real world do not contain other books.
The naming convention was wrong. Of more practical relevance though is the issues it caused in Word outputs.
Microsoft Word bases its TOC on heading levels. In Classic versions of Adobe RoboHelp that could be handled in one of two ways.
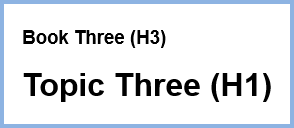
- You could select a check box Maintain HTML Heading Levels. If all your topics started in the usual way with the heading being set to the H1 style, that would be maintained and all books no matter what their level of nesting would also be H1. However, it meant that the book name was in a lower level style than the following topic. Click to see this exampleClick to see this example.
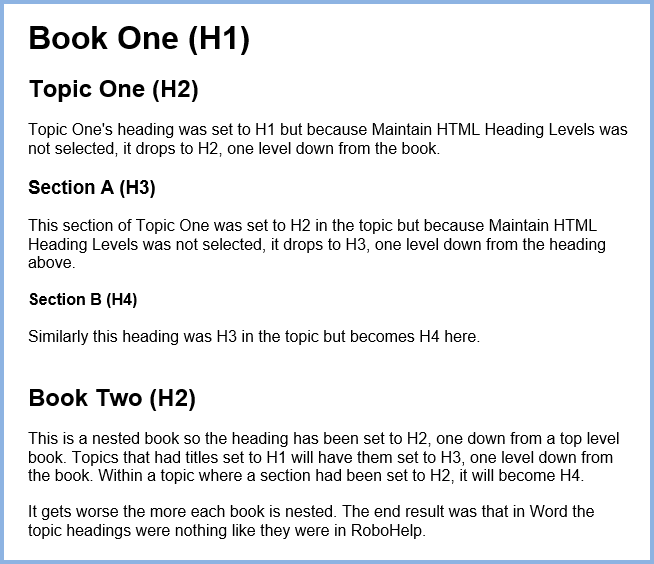
- If you did not select that, in Word you got a nested TOC but the heading levels were all changed from what they were in the topics. Click to see this exampleClick to see this example.
For those reasons the best solution in Classic versions was to create a TOC that flattened all the books to one level. That way book titles were all H1 style in line with the topic headings that followed.
Because of those issues, changes have been made.
The TOC Controls Your Outputs
There is a big change in what goes into an output.
- In Classic versions, an output contained everything that was in Project Manager that was not excluded by the build expression.
- In the new UI versions of Adobe RoboHelp it is controlled by the table of contents.
 Every topic that you want in the output must be in the TOC or have a link from a topic that is in the TOC.
The default topic in online presets is an exception, that is automatically included. In most scenarios you would want to include that in the TOC so that users can easily return to the start of the help, however not including it is an option.
You may not want users to see a TOC with every topic that can be accessed, some you may just want to be links from other topics. Not every topic has to be included in the TOC.
- Topics with links from other topics or the index will be included whether or not they are in the TOC.
- Topics that you do not want users to see in the TOC and that do not have links from other topics or the index must be included. There is a check box to hide such items in the TOC that the user sees. Baggage files are included in this way as described below.
Let's say you have a topic that has links to say twenty others that give supplementary information. Only that one topic needs to be in the TOC as the links will automatically pull in the twenty supplementary topics. That does not prevent you from including any or all of the twenty, it's just that you don't have to.
Baggage Files
Because the TOC controls what goes into an output, you also use it to add baggage files to the output. Baggage files are files you want in the build when you generate but that are not referenced anywhere.
When you click Insert Topic while editing a TOC, as shown below in Adding Items to the TOC, there will be an option Local Files. Select the baggage file you want to add and it will be uploaded when you generate. If you don't want the baggage file to appear in the TOC, just tick Hide in Output in the Properties panel.
How Does It Work?
In Classic versions, there were two ways of working. You either had a separate TOC for online and print to avoid some of the problems or you used one TOC that worked in your scenario, maybe you didn't have many levels of nesting in the TOC.
The changes do not radically change that but do remove the problems that many levels of nesting could cause in printed documents. This will become clearer as you read on.
Online TOCs
These are clearly meant for any online output, frameless, responsive, CHM and so on. The books are now known as sections and can be nested in the same way as in Classic versions.
Book TOCs
These are meant for the PDF and Word outputs. There are two key differences.
- Book TOCs enable Front and Back Matter to be included.
- Whilst sections can be indented, you must be aware that the names of indented sections may not show in Word and PDFs outputs depending on the options you choose.
Both are described in more detail in Book TOCs below.
Setting Up a TOC
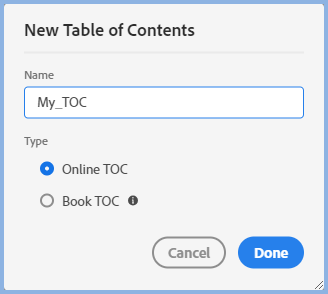
According to how you want to work, set up one or both types by clicking the + icon to display the New Table of Contents dialog. TOCs upgraded from earlier versions, Classic or 2019 New UI, will automatically be set to be online TOCs but you can change that by right clicking the TOC name and changing the type.
The TOC will open in the Authoring area.
If you want to set up more than one TOC, you can duplicate an existing TOC and, if required, change the type.
Right click the TOC in the left panel and select Duplicate, then right click the duplicate and select Properties where you can change the type. After you click Done and Save, the icon in the TOC panel will change.
Online TOCs
Above the blank TOC, you will see these icons that let you add topics and sections.

Sections
Sections enable you to group your topics in the way you want your users to see them. The easiest way to think of these is to think of them is as nested books in older versions.
To add a section, click the right icon and enter the required name.
If you want the section linked to a topic, that can be done in the Section properties.
You can use the arrow icons on the toolbar to create sections within sections and have as many levels of nesting as you require for your online outputs. Beware of having too many levels as that can get frustrating for users.
Topics
Click the left icon in the toolbar to add the topics. You can also drag from the Contents panel. If you drag a folder, it will bring all that folders topics and create a section with the folder name, it can be changed in Properties. Any underscores in the folder name will be removed in the TOC.
Auto-Create
There is an Auto-Create icon that will create a TOC based on your folder structure. You can also right click to auto-create a TOC.
Online TOC Properties
The only property of the TOC itself is whether it is an Online or Book TOC. You can change that by right clicking the TOC name in the Table of Contents panel on the left. Settings for one type are saved if you change to the other type.
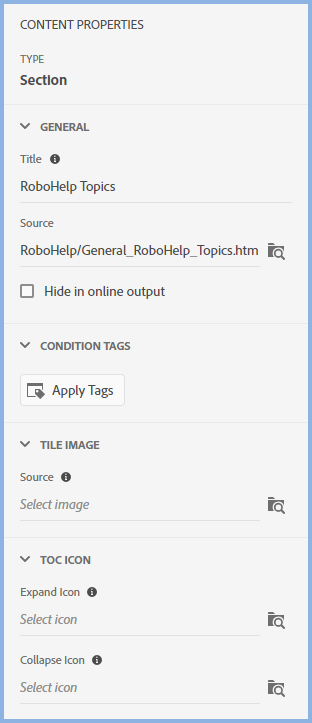
With Online Properties selected, when you click on a section you will see the properties shown in the left image below. When a topic is selected, the Type will be Page as shown on the right.
 |
 |
Title
When you add items to the TOC their folder or topic title will be applied by default.
- You can change that in this dialog and on saving an asterisk will display to show the TOC is out of sync with the folder name in the Contents Panel or the topic title in Topic Properties.
- If you want to restore either to the original names, delete the contents of the title field and click Apply. The titles in Topic Properties and Content Properties will again be in sync.
Source
The path to a topic will be shown here. If you want to link Sections to topics, you can add them here.
Hide in Online Output
Topics have to be in the TOC to be included in the build when you generate. However, you may not want all topics to show in the TOC, particularly if you have a large number of topics and it is only intended that some are accessed from other topics.
Select this option and the topic will be included in the build but will not show in any online TOC. It will not be hidden in the TOC of any printed output.
An alternative way is to apply a Condition Tag as described below.
Condition Tags
An alternative method to hide topics in the TOC but include them in the build is to apply a Condition Tag.
Tile Image
Frameless outputs can include a Home Page with tiles. By default these are controlled from the skin. In the Skin Editor you can go to the Layout tab > Home Page options and select Manage Tiles from TOC. The skin images will then be disabled.
In the Tile Image field you can then browse to your own image for the section or topic selected in the TOC and select your own image(s).
If you do not define a tile for a specific section or topic in the TOC, there will be no tile for that section or topic enabling you to control which appear as tiles.
TOC Icon
When the user has reached the topic linked from the TOC, they will see a traditional TOC on the left where they will either see the skin's default icons or the icons defined for sections and topics in the TOC icon field.
HTML Help Icon
This property will only be seen if Enable Advanced HTML Help Options is selected in Project Settings.
- The Auto Setting will also apply the traditional book icon to Sections and the page icon to topics to all sections and topics by default
- For individual sections and topics you can select either select an option from the dropdown or you can select the Mark as New checkbox to apply an icon to highlight sections and topics that have changed.
Book TOCs
The set up is the same but the toolbar icons are for Topics, Sections, Front Matter and Back Matter from left to right in the screenshot below.
Front Matter and Back Matter are new terms within Adobe RoboHelp but they are standard publishers terminology. See http://www.publishmybook.online/what-is-front-matter-and-back-matter.html
Front Matter
All Front Matter content is optional.
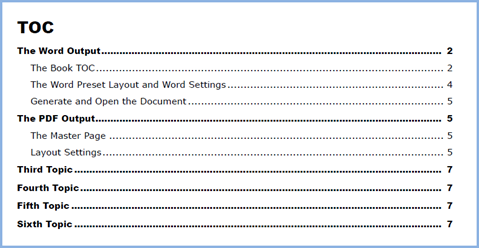
The Front Matter icon lets you add a TOC, a List of Figures, a List of Tables and Other Pages that allow you to add one or more pages in the front of the PDF or Word document.
Cover Pages that were previously set here now form part of the appropriate template. See RH2022 PDF Templates and or RH2022 Word Templates
Any "Other Pages" must be in HTM or HTML format.
 If you have upgraded from a Classic version and have a cover page in DOCX format, open it in Word and save it in Web Page - Filtered format.
Sections
In a Book TOC you have sections in the same way as in an Online TOC but there is a difference in how they work.
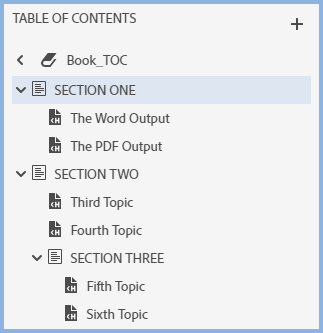
In the TOC editor they can be nested to allow the same TOC to be used for online outputs. However, in PDF and Word outputs the contents of the top level sections will be flattened so that all the topics in that top level section are at the same level as if the lower level sections were not there.
A TOC structure as below would ignore Section Three and show the TOC in the output with the Section Three topics listed below the Section Two topics.
 |
 |
If you link a topic to a section, in a PDF or Word output the topic will appear immediately below the section (think Chapter) name as it did in Classic versions.
Topics
Click the left icon in the toolbar to add the topics. You can also drag from the Contents panel. If you drag a folder, it will bring all that folders topics and create a section with the folder name, it can be changed in Properties.
Back Matter
All Back Matter content is optional.
The Back Matter icon lets you add an Index, a Glossary and a New Page. The New Page allows you to add one or more pages in the back of the PDF or Word document.
New Page(s) must be in HTM or HTML format.
Auto-Create
There is also an Auto-Create icon that will create a TOC based on your folder structure.
Example of the Mixed Use of TOCs
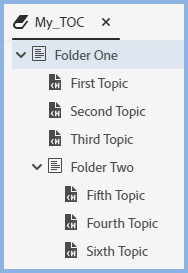
This TOC has Folder Two nested within Folder One.
Online Outputs
The TOC in your outputs will have the same structure.
Book Outputs
As shown above, you would just get a document with the contents shown as straight list.
- Folder One (as a section heading)
- First Topic
- Second Topic
- Third Topic
- Fourth Topic
- Fifth Topic
- Sixth Topic.
What you would do with the Properties set to Book TOC is add Front Matter and Back Matter in addition to any sections required.
 If you change the section or topic names or the order of the topics, it will affect both online and book outputs using the same TOC.
Editing a TOC
When you create a TOC, it opens in the Authoring area. Thereafter you can open it there for editing or you can edit in the TOC pane on the left. Typically the TOC pane will be used for simpler edits.
If you have multiple TOCs, when you expand one of them, the others are temporarily hidden so that you can focus on the open TOC. As soon as you collapse a TOC, the others will be displayed again.
You can duplicate an existing TOC as the base for a new TOC and you can copy/cut/ paste items between TOCs.
Editing the TOC in the TOC pane on the left and editing in the authoring area have an important difference.
- In the TOC panel any changes made there are autosaved and you will see the changes mirrored in the authoring area if you also have the TOC open there. There are two ways to reverse any changes made in the TOC pane. The quickest way if you have made many changes is to click in the panel and keep using CTRL Z until you get back to where you want to be. You can also right click and use the Undo and Redo options in the context menu.
- In the authoring area changes are not autosaved. As you make changes, an asterisk will display in the tab to show there are unsaved changes. The changes will only show in the TOC panel when you save the changes.
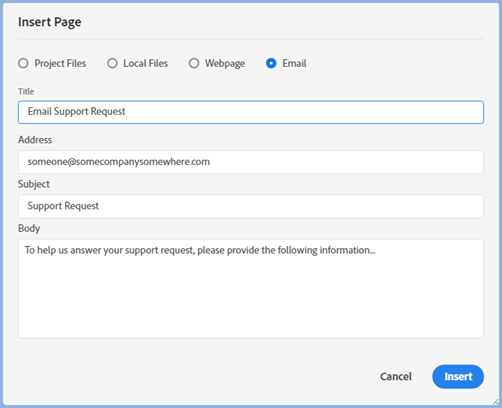
Adding eMails to a TOC
You can add an email link in the TOC that will create an email in the users default email program.
TOC Titles In Sync With Topic Titles
When you add a topic to your TOC it defaults to using the topic title. Change the topic title and the TOC will automatically sync with the new title. This will not override a topic title you enter into the TOC.
How does this work?
Within the Adobe RoboHelp internal files, the topic title is left empty by default. If you do not manually enter a string Adobe RoboHelp will display the TOC title as the topic title.
When you generate an output, RoboHelp will check the internal file to see if the TOC title is empty and if it is, it will use the topic title. If you have entered a string though, that will take priority and be used.
I entered a string but now I want the two in sync.
In the TOC, delete what you entered and click Apply.
Does this work in projects upgraded from earlier versions?
Yes. During the upgrade Adobe RoboHelp compares the TOC title with the topic title. If they are the same, internally the TOC title will be empty and work the same way as in a new project. If they differ, the TOC title will use your original title.
Broken Links
Red Xs will show against any item in the TOC where the link is broken.
Further Information
In Building the Foundation of a Superior Help System, Beth Gerber of Lightext covers a number of areas including this feature.
Beth covers customising the TOC.
Donations
If you find the information and tutorials on my site save you time figuring it out for yourself and help improve what you produce, please consider making a small donation.